Building Models
Building art and animations for PlayCanvas can be done using almost any of the many 3D modeling programs available. For example: Blender, SketchUp, Autodesk 3D Studio Max or Autodesk Maya.
PlayCanvas is designed to import content most faithfully via the open source glTF binary (GLB) format so, in general, if your modeling application supports GLB, PlayCanvas supports it too.
The import of GLBs supports the following glTF features for incredibly fast scene creation:
- Node hierarchy
- Standard material
- Ratified material extensions
- Animated skeletons and skinning data
- Morph targets
- Cameras
- Draco compressed models
- Punctual light support
As such, to target PlayCanvas, you do not have to use any special art tool plugins and there are no PlayCanvas-specific workflows you must follow.
(Model by Loïc Norgeot and mosquito scan by Geoffrey Marchal for Sketchfab licensed under CC BY 4.0).
PlayCanvas also supports the importing of FBX files which is another common interchange format. However, FBX materials are not imported as faithfully as glTF materials and might require some editing after import.
We recommend using GLBs whenever possible for the best experience and highest compatibility.
Some modeling and animation programs to consider:
- Free options: Blender*, Wings3D, Voidworld, SketchUp, Sculptris, Daz Studio*.
- Lower-cost paid options: 3D-Coat, NVIL, Hexagon.
- Higher-cost paid options: ZBrush, Autodesk 3D Studio Max*, Autodesk Maya*, Luxology Modo*.
* this program can create animations too.
For generating textures, consider these programs:
- Free: Blender, Pixexix Free, xNormal, MaPZone, GIMP, Krita desktop, MyPaint.
- Paid: Substance Designer (as well as Substance Painter and Bitmap2Material), Photoshop, Quixel NDO and DDO, CrazyBump, Pixexix Pro, Clip Studio Paint/Manga Studio, SERIF DrawPlus/PhotoPlus.
Note many of the programs listed above for modeling also allow texture painting. If you would like more options, this external wiki page can help. Please note that some of the information may be out-of-date.
General Considerations for Mesh Construction
Regardless which modeling application you are using, there a number of things to be aware of when building 3D scenes intended for PlayCanvas.
- Meshes can be skinned to up to 256 bones.
- NURBS meshes will be converted to triangle meshes on conversion to the PlayCanvas native format.
Blender
![]()
Blender is a fantastic free tool for 3D modeling and it is perfect for generating 3D assets for PlayCanvas.
Blender supports exporting to GLB, FBX and COLLADA but the built-in exporters do have some limitations.
Map Types
As of Blender 2.71, both diffuse and normal maps of your material will be exported to the FBX file. If other map types are lost on export you have to set-up these maps in the Material Editor within the Editor.
Embedding Textures
Embedded Textures make importing much easier.
The Blender COLLADA exporter does not have the ability to embed textures into the exported model file.
The 2.71 release of Blender features a revamped FBX export module that enables multiple embedded textures directly from Blender. First make sure the object is rendered correctly within Blender. When exporting to FBX, set the 'Path Mode' to Copy and check the 'Embed Textures' box.
Alternatively, use the Autodesk FBX Converter to convert an export from Blender into one with embedded media. Just open the file in the FBX Converter and re-save with the Embedded Media checkbox set.
Animations
As of Blender 2.71:
Animations included within the blend file are exported with the default fbx exporter settings and are compatible with the PlayCanvas asset import pipeline. Note that for multiple animations for the same model you will need to upload multiple fbx files - one for each animation. To save memory you can delete models and textures from the blend file before exporting, choose to export only armatures in the fbx exporter settings, or simply delete the duplicate 'model' target assets from the assets page on your project dashboard (select 'target' from the drop-down menu on the assets page to view target assets).
Learning Blender
There are plenty of resources for learning how to use Blender on the web. A couple that we recommend are:
Autodesk 3D Studio Max
Max Materials
You should use the Standard material type in Max, or the Multi/Sub-Object material type providing the materials it references are Standard materials. The highlighted areas in the screenshot below show the settings that are respected when you export to PlayCanvas:
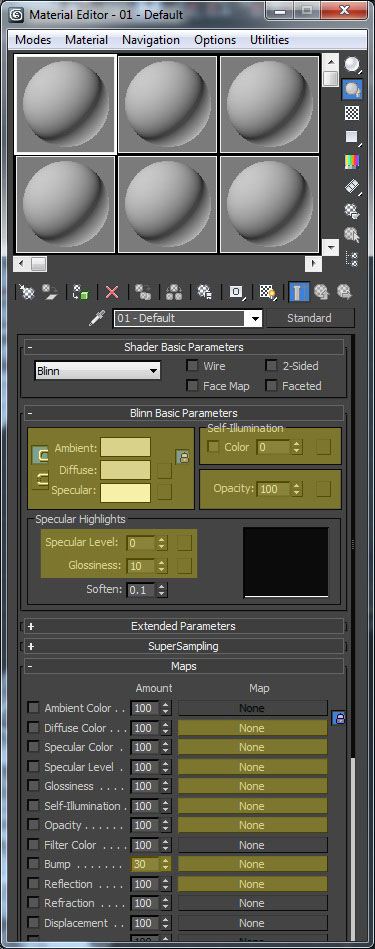
Supported Map Slots
PlayCanvas interprets a subset of the 3DS Max material map types on export. Note that maps can be in any format that 3DS Max supports, but if the maps are not in a web format (namely JPEG, GIF or PNG) then they will be converted to these formats on export.
Diffuse Color
Assigning a Bitmap map to this slot enables diffuse mapping on the PlayCanvas material. This essentially overrides whatever diffuse color has been set on the material (via the color picker). If the diffuse map has an alpha channel, it will be used as the per pixel alpha value in the PlayCanvas runtime.
Additionally, it is possible to assign an RGB Multiply map to the Diffuse Color slot. This has the effect of enabling lightmapping, where Map 1 is the diffuse map and Map 2 is the lightmap.
Specular Color
Assigning a Bitmap map to this slot enables specular mapping in the PlayCanvas material. This essentially overrides whatever specular color has been set on the material (via the color picker). This allows you to mask out areas of specularity on a surface, or tinge specular highlights different colors in different areas. If the specular map has an alpha channel, it will be used to set per-pixel shininess.
Specular Level
Assigning a Bitmap map to this slot activates per-pixel attenuation of the material's specular color. This essentially overrides whatever specular level has been set on the material.
Glossiness
Assigning a Bitmap map to this slot activates per-pixel glossiness on the material. This essentially overrides whatever glossiness has been set on the material.
Self-Illumination
Assigning a Bitmap map to this slot enables emissive mapping in the PlayCanvas material. An emissive map can be full RGB (you are not limited to greyscale) and will essentially be added to the result of lighting a surface. So a black pixel in a emissive map will result add nothing to a pixel's value. Anything else will increase a pixel's luminosity.
Opacity
Assigning a Bitmap map to this slot enables opacity mapping on the PlayCanvas material. A black pixel in the opacity map will be fully transparent, a white pixel will be fully opaque and any grey pixel will correspond to some equivalent intermediate alpha value.
If the material has an opacity map, it will override any alpha channel that may have been set in the diffuse map. It is less efficient to use the opacity map slot over the alpha channel of the diffuse map since two textures are generated in the PlayCanvas runtime instead of one and the default shader must do a little more work. However, if performance is not a concern and it is convenient to use an opacity map, the functionality is supported.
Bump
Assigning a Normal Bump map to this slot enables normal mapping. Note that, by default, the 'Amount' value for the Bump slot is set to 30. PlayCanvas effectively ignores this value and treats it as if it were set to 100, so it is recommended that you set this to 100 in Max also in order to make a render match the real-time rendering more closely.
There are different ways to author normal maps, the main two differing in the format of the green component. For example, by default, 3DS Max would expect a normal map for a brick wall to appear as follows:
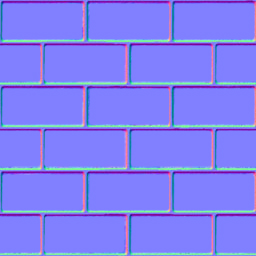
Notice lighter areas at the bottom edge of raised areas. PlayCanvas expects the green component (or the Y component of each normal in the normal map) to be flipped. Loading the file into Photoshop, selecting the green channel and pressing Ctrl+I to invert the channel gives:
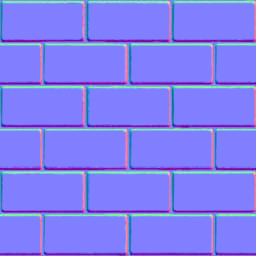
Now, lighting in PlayCanvas will be consistent.
If the assigned normal map has an alpha channel, it will be treated as a parallax map with the alpha channel interpreted as a height map. Lighter areas of the height map are treated as 'higher' than the darker areas.
Reflection
Assigning a Bitmap map to this slot enables sphere mapping in the PlayCanvas material. The bitmap would look something like this:
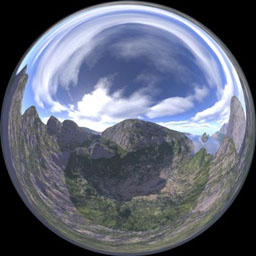
Sphere mapping is one of the cheapest, least 'convincing' forms of reflection mapping, but in many scenarios it is sufficient to provide a pleasing glossy sheen to surfaces.
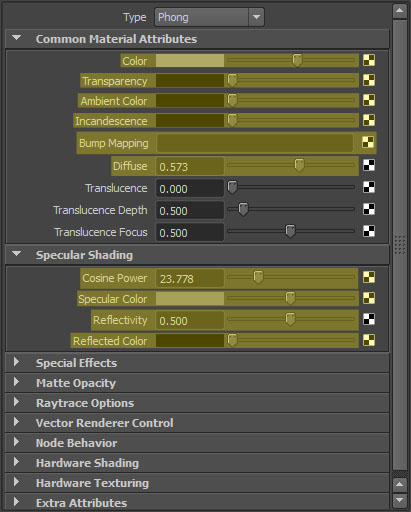
Autodesk Maya
Maya Materials
You should use the standard material types in Maya: lambert, blinn and phong. The highlighted areas in the screenshot below show the material settings that are respected when you export to PlayCanvas: