Clustered Lighting
Lights are a great way to add realism to your application. However, real time lights can also create significant runtime performance cost, especially when you have large numbers of lights that cast shadows.
Part of the solution to reduce performance costs may involve limiting the amount of lights that affect individual meshes. This is often implemented by finding and using lights that are nearby each object. However, there are multiple disadvantages to this strategy:
- Since each object can use different sets of lights, a custom shader must be compiled to handle them.
- Large objects need to be split into smaller objects in order for this strategy to be effective.
- Large numbers of shadow casting lights can cause the shader to run out of the available texture slots used by shadow maps.
To address these issues, PlayCanvas uses the Clustered Lighting solution to provide a performant implementation of Omni Lights and Spot Lights. It stores information about the lights in textures and allows the GPU to easily use only the lights that are nearby the shaded fragment. There are multiple advantages to Clustered Lighting:
- Shaders do not need to be recompiled when lights are added or removed from the scene, since the shader can handle multiple lights.
- Large numbers of lights (including Shadows and Cookies) can be used in the scene, since only the lights nearby each pixel are evaluated.
Note that Directional Lights affect all objects so they do not use the Clustered Lighting solution.
Implementation Overview
The following steps provide a basic overview of the Clustered Lighting implementation:
- Cull lights by all of the camera's frustums, to evaluate the list of lights visible for a frame.
- Place a world space 3D grid over the axis aligned bounds of all visible lights.
- Each cell in the 3D grid stores the light indices that intersect with it. On the CPU, this information is updated every frame and it is allowed to get a list of the lights that affect any positions. The information is stored in a texture and made available to the GPU.
- The properties of all visible lights are stored in another texture, so they are also accessible by the GPU.
- Shadow Maps and Cookie Textures are all rendered into an atlas, instead of being individual textures, so they are all accessible to the shader at the same time.
- During lighting evaluation in the fragment shader, a fragment world space position is used to access a cell of the 3D grid and evaluate the stored lights.
Editor Options
Options for Clustered Lighting can be found in the Editor Settings under 'Rendering'.
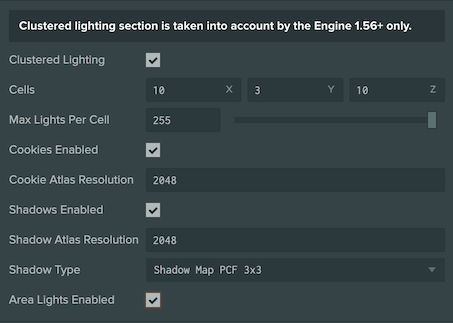
This will allow you to disable Clustered Lighting (if you need to use the previous lighting system) and to tune performance and features mentioned below.
Tuning Clustered Lighting
Enabling Features
The Clustered Lighting shader needs to handle all supported lights, so it must contain the code to handle these features. This can cause the shader to be larger than needed and take longer to compile. To resolve these issues, there is a set of feature options that allow you to disable the features your applications doesn't need and speed up the shader compilation:
- Shadows Enabled – Enable or disable the support for Shadows
- Cookies Enabled – Enable or disable the support for light Cookies
- Area Lights Enables – Enable or disable the support for Area Lights
Configuring the 3D Grid
The Cells property allows you to specify the number of cells along each world axis. This dynamically subdivides the Axis Aligned Bounding Box, that contains all visible lights, into a specified number of cells.
The Max Lights Per Cell property allows you to specify the maximum number of lights stored in each individual cell. This represents the maximum number of lights that overlap. Usually, the number of lights must be increased for coarser grid subdivisions, since the light overlap is larger.
Configuring Atlas
All of the Shadow Maps and Cookie Textures used by visible lights are stored in an atlas. There is one atlas texture for Shadows and another for Cookies. The atlases can have different resolutions, although internally they use the same subdivision into smaller areas used by individual lights.
Shadow Atlas Resolution allows the Shadow atlas size to be configured, while Cookie Atlas Resolution allows for the Cookie atlas to be set. The sizes do not need to be a power of 2.
Atlas Split controls how the atlas is split into the individual sub-textures used by lights. There are two split strategies:
- Automatic – When the array size is specified as 0, the engine automatically splits the atlas as needed, to assign each visible light an equally sized sub-texture. For example, if you have three lights visible in a frame, the atlas will split into 2x2 sub-textures, and three of those four sub-textures will be assigned to the lights.

- Manual – Allows the atlas to be split into a fixed number of sub-textures, which can be different sizes. It is set up using an array of numbers, where each number represents a split, both vertically and horizontally. See the next section for an example of manual atlas splits.
Configuring Manual Atlas Split
To understand how an atlas is manually split, take an array with two numbers: [2, 2]. The first number in the array splits the atlas into 2x2, for a total of four areas. Any following numbers in the array would split these areas again. In this case, the second number in the array splits one of the existing areas into another 2x2 (e.g. four areas), for a combined total of 7 areas.
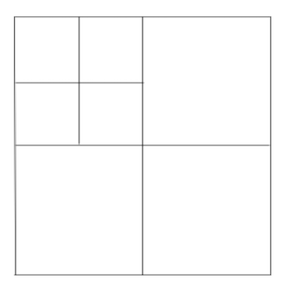
The following image shows how the manual atlas split should be specified.

Other Examples:
- [3, 2] – The first number splits the atlas into 3x3 (9 areas). The second number splits one of these areas into 2x2 (4 areas), for a total of 12 areas.
- [4] – The atlas is split into 4x4 (16 areas).
The main advantage of using manual subdivision is the level of detail that can be achieved. You can set up a fixed amount of sub-textures, which are assigned to the lights by order of their screen-space size. This allows lights that are larger on screen to receive a larger area of the atlas, while smaller lights in the distance use a smaller area of the atlas. If there are more lights than the number of available areas, the smallest screen-space lights will not cast any shadows.
Shadows Type
All lights that cast shadows use the same shadow type. This allows you to globally set the shadow softness and related performance impact. The supported options are PCF1, PCF3, and PCF5. For more information, see the Shadows page.
Limitations
Internally, a light index is stored using 8 bits, so the maximum number of visible lights at any frame is 254 (one index is reserved). In the future, there may be an additional option to use 16 bits to store the index and increase the limit.
Performance Considerations
- Cell subdivisions should be as small as possible, since large cell subdivisions lead to larger CPU usage when the grid is filled by the lights each frame. This should be optimized for each scene, depending on its lighting complexity. Optimally, you should have enough cells to limit the overlap of lights and the number of lights in each cell.
- The Max Lights Per Cell should be as small as possible, since this limits the size of the texture used to store the 3D grid, which needs to be updated every frame.
- If an application using Clustered Lighting runs slowly on older mobile devices, consider globally turning off features like Shadows or Cookies.
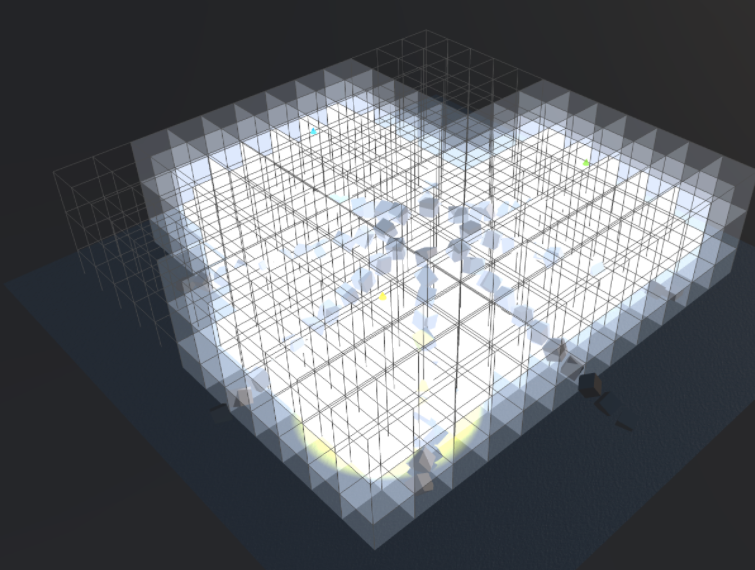
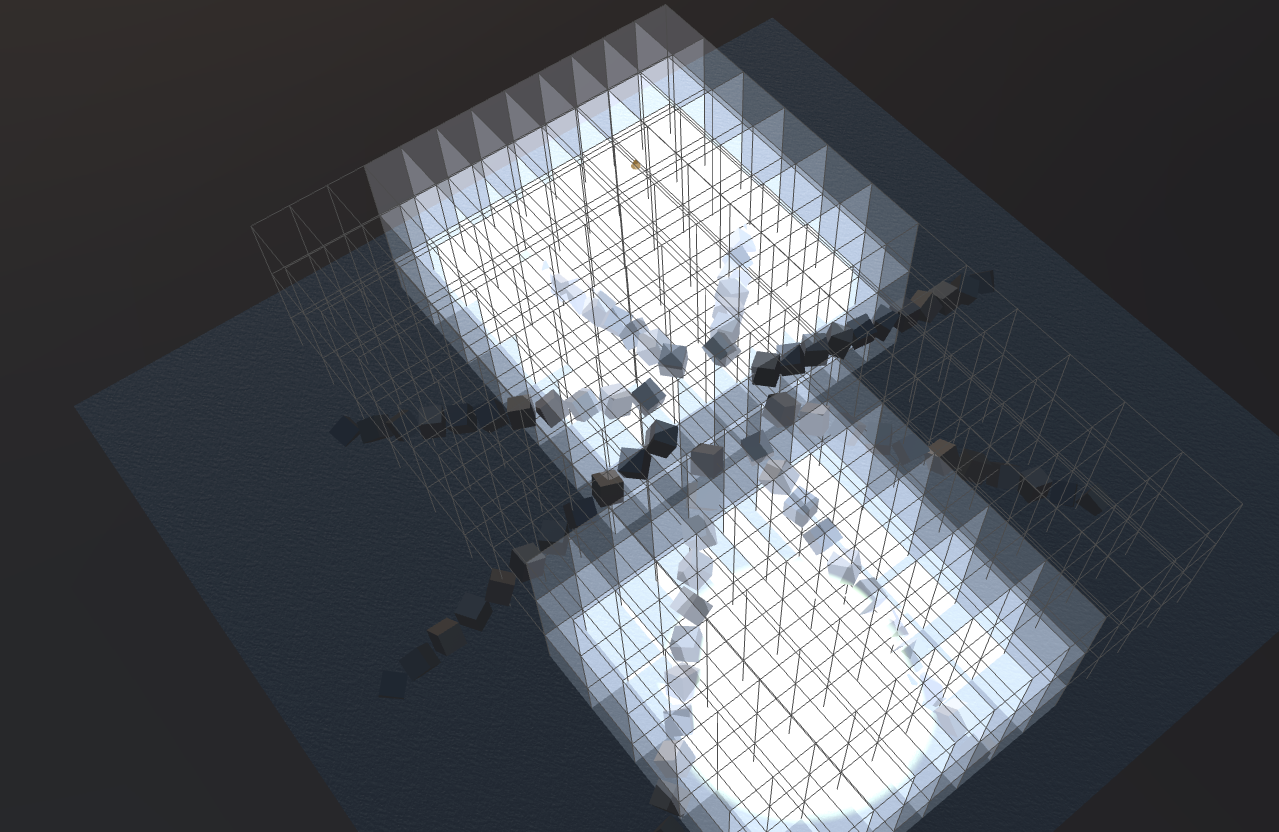
Render Debug Grid
To help with debugging and tuning performance with Clustered Lighting, you can assign the Layer ID to render to to the debugLayer of LightingParams. e.g
// Assuming being in a script type
this.app.scene.lighting.debugLayer = this.app.scene.layers.getLayerByName("World").id;
And to stop rendering, assign undefined to the debugLayer property:
// Assuming being in a script type
this.app.scene.lighting.debugLayer = undefined;