Settings
The Settings panel lets you set up various properties. It is accessed using the 'cog' button in the bottom left of the Editor (on the Toolbar).

Editor
These are personal preferences for the Editor.
Grid
You can set the number of divisions and the size of each division for the Grid that appears in the Editor scene.
Snap
This is the snap increment used when snapping is enabled.
Camera Clip
Here you can set the near and far clip planes for the Editor cameras.
Clear Color
This is the clear color of the Editor cameras.
Icon Size
This is the size of the icons that appear over various components inside the 3D viewport. Set this to 0 if you don't want to see icons at all.
Local Server
This is the URL where all the scripts are going to be loaded from, when launching the Application with Launch Local.
Locale
The locale that you can preview in the Editor and when you Launch your application. This is only visible to you not other members of your team. This is used when you have enabled Localization for Text Elements and when you use Localized Assets.
Physics Settings
Physics settings affect the simulation of all the rigid body components in your scene.
Enable
If this is enabled then the 3D physics library will be included in your Application.
Gravity
Gravity is the acceleration applied every frame to all rigid bodies in your scene. By default, it is set to -9.8 meters per second per second, which essentially approximates Earth's gravity. If you are making a game in space, you might want to set this to 0, 0, 0 (zero g).
Rendering
Rendering settings affect various graphics related properties.
Ambient Color
The color of the scene's ambient light source. PlayCanvas allows you to create directional, point and spot lights. These lights account for direct light that falls on objects. But in reality, light actually bounces around the environment and we call this indirect light. A global ambient light is a crude approximation of this and allows you to set a light source that appears to shine from all directions. The global ambient color is multiplied with the Ambient property of a Phong Material to add a contribution to the final color of an object.
Note, if you are using a Skybox and Physical Materials the Ambient Color has no effect.
Skybox
The Skybox is a cubemap asset that is rendered behind your 3D scene. This lets your use a set of 6 2D images to display the distant world beyond the 3D models in your scene.
To add a skybox, create a cubemap asset and then assign it to the cubemap slot in the settings panel.
Note, if you are using a Prefiltered Cubemap, the skybox will be used as the default environment map for all Physical materials.
Skybox Intensity
This is a slider that controls the intensity or brightness of the skybox. The value can range from 0 (totally black) to 32 (brightest).
Skybox Mip
When using a Prefiltered Skybox, you can select the skybox mip that you want to display. Each mip is a more blurred version of the original Skybox. You can use this to show a more blurred / abstract version of your original Skybox for example for artistic purposes.
Tonemapping
Tonemapping is the process of compressing High Dynamic Range (HDR) colors into limited Low Dynamic Range (e.g. into visible monitor output values). There are two options for tone mapping.
- Linear: imply scales HDR colors by exposure.
- Filmic: More sophisticated curve, good at softening overly bright spots, while preserving dark shades as well.
Linear tone mapping is active by default, it's simply (color * exposure). You can tweak exposure to make quick changes to brightness. Note that it's not just simple brightness à la Photoshop because your input can be HDR. e.g. If you have a light source with intensity = 8, it will still be quite bright (4) after exposure = 0.5. So, all visible things won't just fade out linearly.
Filmic tone mapping is a good choice in high-contrast environments, like scenes lit by bright Sun, or interiors with bright lights being close to walls/ceiling. It will nicely remap out-of-range super bright values to something more perceptually realistic (our eyes and film do tone mapping as well, we don't see physically linear values). Well, ask any photographer: nobody likes to leave extremely bright spots as well as pitch black spots on a photo. Filmic tone mapping gives you nice abilities to get rid of such spots.
Exposure
The exposure value tweaks the overall brightness of the scene.
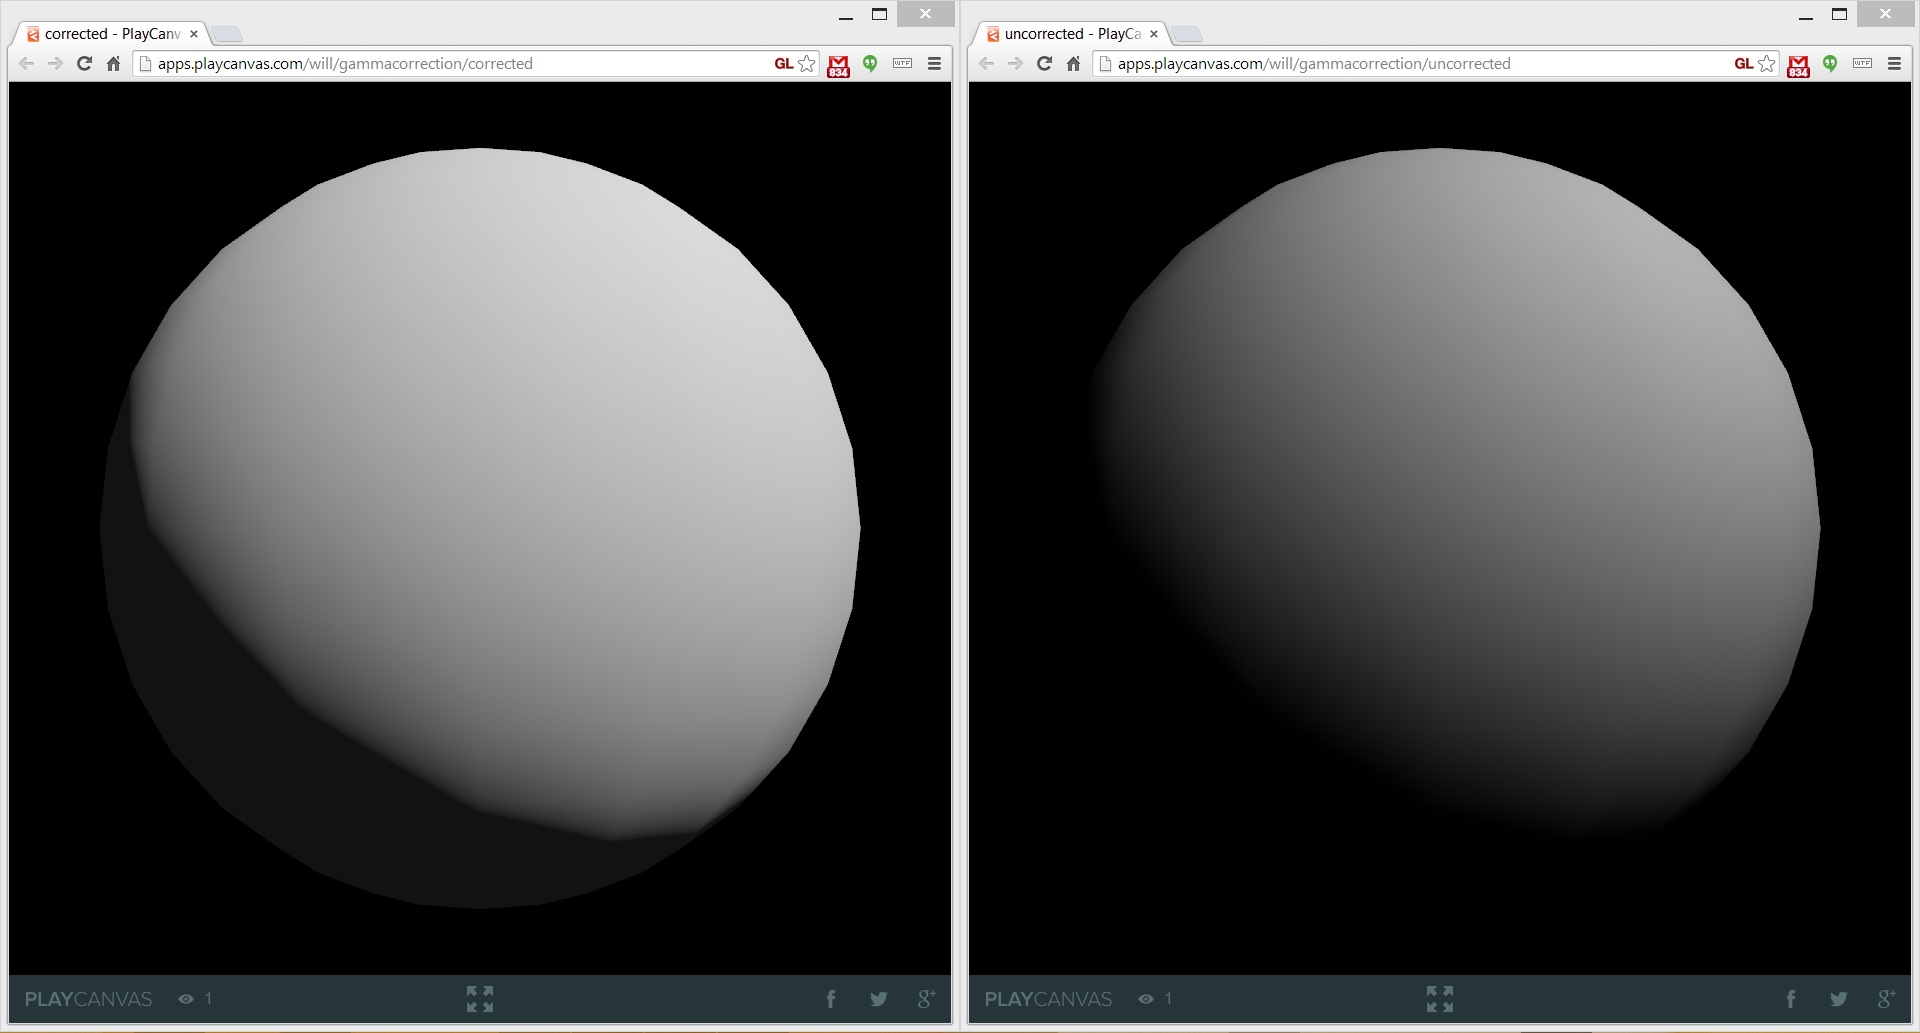
Gamma Correction
Computer screens are set up to output not physically linear, but perceptually linear (sRGB) signal. However, for correct appearance when performing lighting calculations, color textures must be converted to physically linear space, and then the fully lit image must be fit again into sRGB. Rendering with gamma correction enabled reduces the number of ugly, overly saturated highlights and better preserves color after lighting, and it's generally recommended that this be enabled in your scene. The following image shows a simple scene with a sphere. On the left the scene has been gamma corrected while on the right, the scene is uncorrected.
To find out more about gamma correction, read this GPU Gems chapter.
Fog
The Fog Type property can be used to control an approximation of an ambient fog in your scene. Here is an example of fog being enabled:
The types available are as follows:
- None - Fog is disabled
- Linear - Fog fades in linearly between a Fog Start and Fog End distance
- Exp - Fog fades in from the view position according to an exponential function
- Exp2 - Fog fades in from the view position according to an exponential squared function
Color
The color of the fog. This color is blended with a surface's color more as the fog fades in.
Start Distance
The distance in scene units from the viewpoint from where the fog starts to fade in.
End Distance
The distance in scene units from the viewpoint from where the fog reaches a maximum. Any objects beyond this distance will be rendered with the fog color.
Fog Density
The fog density controls the rate at which fog fades in for Exp and Exp2 fog types. Larger values cause fog to fade in more quickly. Fog density must be a positive number.
Resolution
Control the width and height of your Application. You can also set the resolution mode to one of the following values:
- Auto - The resolution will always be the same as the canvas size
- Fixed - The resolution will always be width x height pixels.
Fill Mode
Fill mode controls the sizing behavior of the canvas. You can set one of the following values:
- None - The canvas will be the same size as the resolution width and height.
- Keep aspect Ratio - The canvas will expand to fill the window while maintaining the correct aspect ratio.
- Fill window - The canvas will stretch to fill the window completely.
Device Pixel Ratio
When enabled the canvas resolution will be calculated including the device pixel ratio.
Transparent Canvas
Enable alpha-blending on the main canvas element.
Preserve Drawing Buffer
Use the preserveDrawingBuffer option when creating the WebGL context.
Layers
Manage rendering layers and their render order. You can find out more about layers here.
Audio
Use Legacy Audio
Enable the legacy audio components. Use this only for compatibility with old projects as it has been deprecated.
Lightmapping
Size Multiplier
Scene-wide multiplier applied to all lightmap sizes.
Max Resolution
The maximum texture size available for generated lightmap textures.
Mode
Scene-wide mode for lightmap baking, with the following options:
- Color Only – Bakes a single lightmap containing HDR colors.
- Color and Direction – Bakes a second lightmap containing the dominant light direction, allowing for specular lighting. The Color and Direction mode is not compatible with Soft Directional Light or Environment Light baking.
Filter
Enables bilateral filter on Runtime Baked Lightmaps.
Range
A range parameter of the bilateral filter. Larger values apply more widespread blur.
Smoothness
A spatial parameter of the bilateral filter. Larger values blur colors that are less similar.
Ambient Bake
Enables baking of Environment Light.
Samples
The number of samples that are used to bake the ambient light into the lightmap.
Sphere Part
The amount of the sphere that is used to bake environment light.
Occlusion Brightness
The brightness of the baked ambient occlusion.
Occlusion Contrast
The contrast of the baked ambient occlusion.
Batch Groups
Here you can create and manage Batch Groups for the Project. You can assign Model components and Element components to Batch Groups and the engine will attempt to reduce draw calls by merging the mesh instances of objects in the same group together. See more on Batching here.
Loading Screen (Available for ORG users only)
Here you can set the script that creates the loading screen of you application. To create a new loading screen script click Create Default. See more information about custom loading screens here.
External Scripts
Here you can specify the URLs of external scripts you would like to include in your application. These URLs are added as <script> tags in the main HTML page of the application before any other script is loaded.
Input
Here you can enable or disable various input devices for your application.
Localization
Here you can specify JSON Assets that contain localization data. Assets in this list will automatically be parsed for localization data when loaded. These are used to localized your Text Elements.
You can click CREATE NEW ASSET to create a new localization asset. You can then add data to that asset for the desired locale.
Read more about localization here.
Asset Tasks
Auto-run
Run the asset pipeline automatically when an asset is uploaded.
Textures POT (power-of-two)
When a texture is imported resize it to be the nearest power of two.
Create Atlases
When a new image is uploaded it will be created as a Texture Atlas instead of a Texture.
Search related assets
If an asset is updated with a new version, search for related assets (such as materials and textures) that were created from the original asset outside of the asset's folder. Otherwise, only check inside the current folder for related assets.
Overwrite Model
When importing a scene (e.g. an FBX) this setting decides whether the model file is overwritten with a new version imported from the scene.
Overwrite Animation
When importing a scene (e.g. an FBX) this setting decides whether animation files are overwritten with a new version imported from the scene.
Overwrite Material
When importing a scene (e.g. an FBX) this setting decides whether material files are overwritten with a new version imported from the scene.
Overwrite Texture
When importing a scene (e.g. an FBX) this setting decides whether texture files are overwritten with a new version imported from the scene.