Runtime Lightmaps
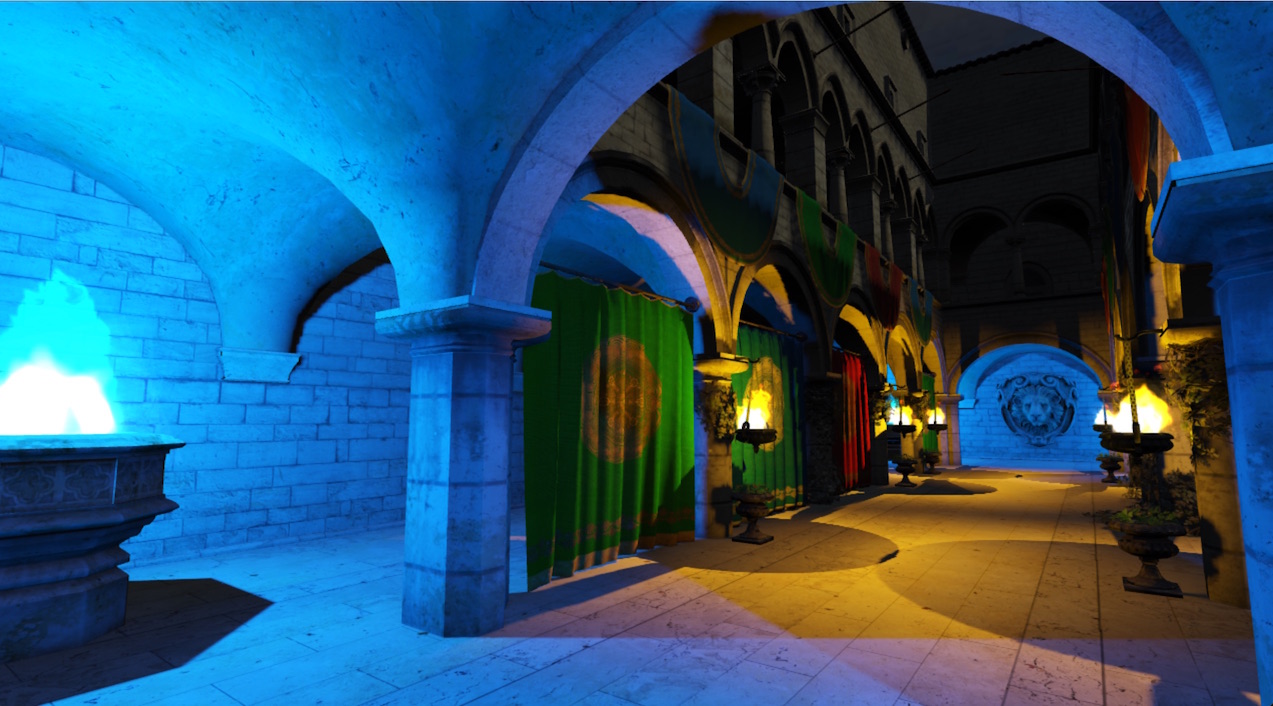 All the lighting in this scene is provided by lightmap textures
Lightmap generation is the process of pre-calculating lighting information for a static scene and storing it in textures, which are then applied on materials. This is an efficient and realistic way to light a scene if many of the light sources and geometry are static or environmental.
Runtime Lightmap Generation
PlayCanvas offers a convenient solution to generating lightmaps. Using the standard light components in the Editor, you can choose which lights are used to bake lightmaps and which are used to dynamically light the scene at runtime. The lights that you set to bake will be used when the application generates the lightmaps that light the scene.
There are multiple advantages to runtime lightmap generation:
- Lighting is not performed at runtime
- It is possible to use hundreds of static lights to light your scene
- In most cases, rendering lightmaps at runtime is faster than downloading many lightmap textures
- It is possible to mix static and dynamic lights in the Editor
- Rebaking can be performed at runtime
- Lightmaps are HDR
- Both Color and Direction data can be baked, enabling some specularity on baked surfaces
However, a disadvantage of runtime lightmap generation is that currently we do not support baking global illumination or some other advanced features of specialized baking tools.
Setting Up Lights for Baking
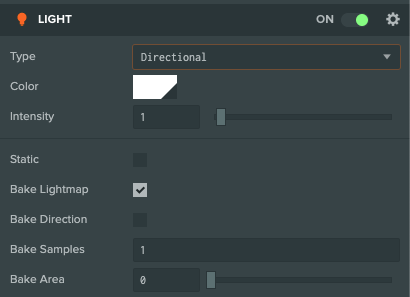
Each Light Component contains the following settings to enable lightmap baking. By default, new lights are set to Dynamic.
- Bake Lightmap – When enabled, the light will bake lightmaps for any lightmapped model that is in range.
- Bake Direction – Specifies whether light contributes to light direction information baking. This affects specularity results if the Color and Direction Lightmapping Mode is chosen in Scene Setting.
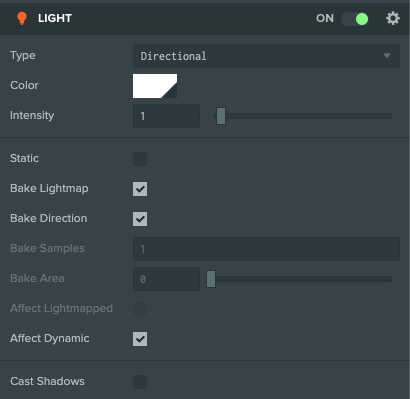
There are two other options that modify the lights behavior: Affect Dynamic and Affect Lightmapped. These determine which models the light will affect at runtime. If either of these options are enabled, the light will operate at runtime and incur runtime cost.
- Affect Dynamic – If enabled, the light will affect any model that is not lightmapped.
- Affect Lightmapped – If enabled, the light will also affect any model that is lightmapped.
Note that a light can't have both Bake Lightmap and Affect Lightmapped enabled, as this would generate a lightmap for a model while the light adds the same lighting at runtime (i.e. the same work is done twice).
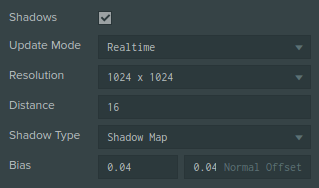
Lightmap lights use the same Shadows setting as dynamic lights, except the shadow calculations are done once, when generating the lightmaps. This way, it is much cheaper to enable shadows on lightmap lights. For more information, see the Shadows page. Note that the Shadow Cascade options are ignored for baking.
Soft Directional Light
By default, baked lights cast hard shadows. To improve the visual quality, a soft baked shadow is available for Directional lights when the Bake Direction option is not enabled. In this case, two additional options are available:
- Bake Samples – Specifies the number of sampled used to bake the light into the lightmap. It defaults to 1 and has a maximum value of 255. The value affects the baking performance and should be set as low as possible (5-20).
- Bake Area – Specifies the penumbra angle in degrees, allowing a soft shadow boundary.
The following images show the difference between hard shadows and soft shadows. The Bake Samples is 15 and the Area is 10.
Baking an Environment Light
PlayCanvas supports two types of environment lighting: Ambient Color and Skybox. By default, these are both applied at runtime.
A limitation of runtime environment light application is the lack of Ambient Occlusion. As an alternative, the environment light can be baked into the lightmap, including Ambient Occlusion. This can be configured in the Lightmapping section of the global settings.
If Ambient Bake is enabled, the contribution of the environment light will be baked to the lightmaps, including this Ambient Occlusion. Note that the Samples setting affects the baking performance and should be set as low as possible (5-20).
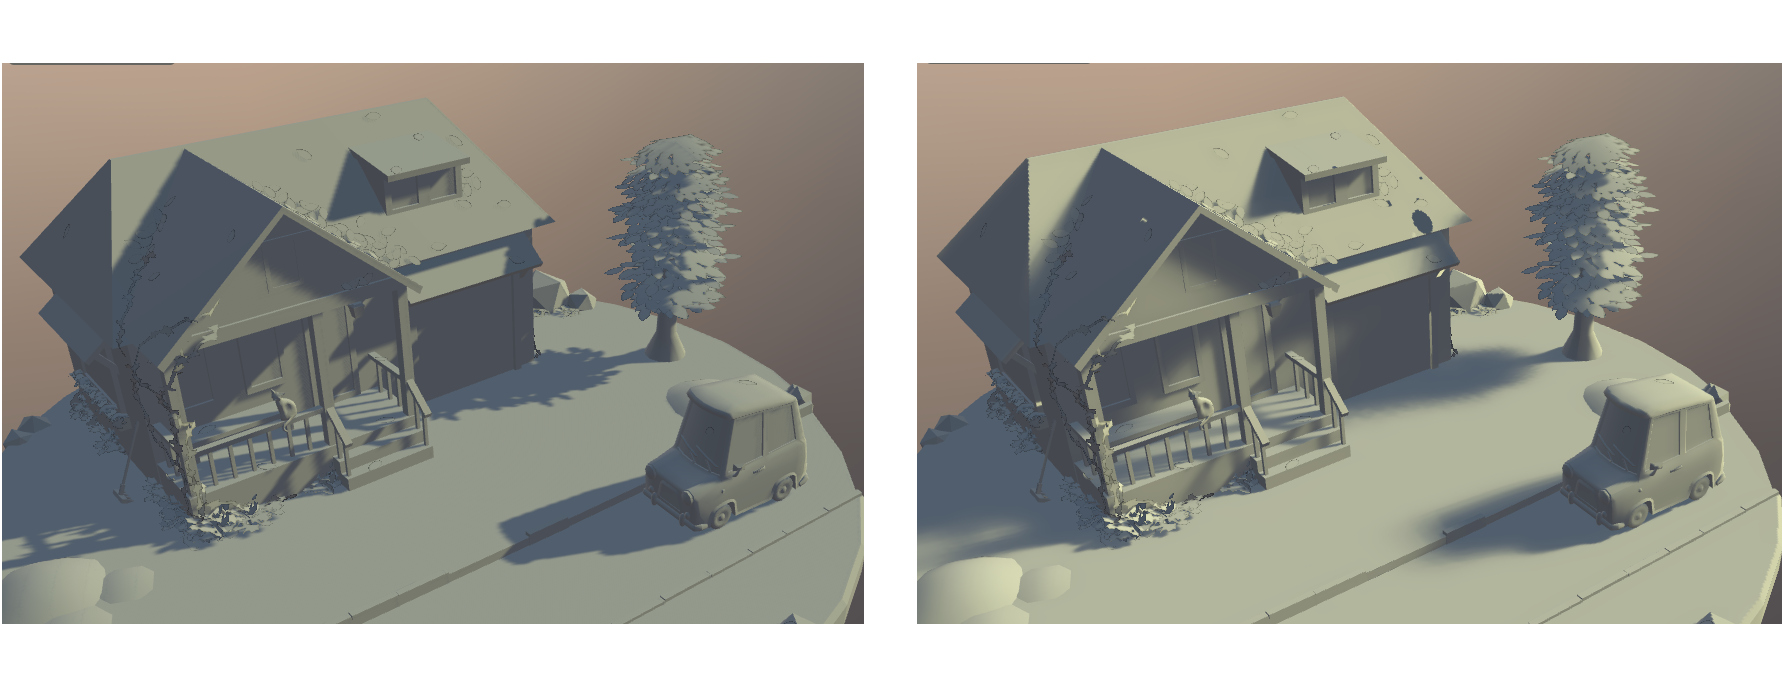
The following images show the effect of Ambient Color, with and without the Ambient Occlusion.
Lightmap Filtering
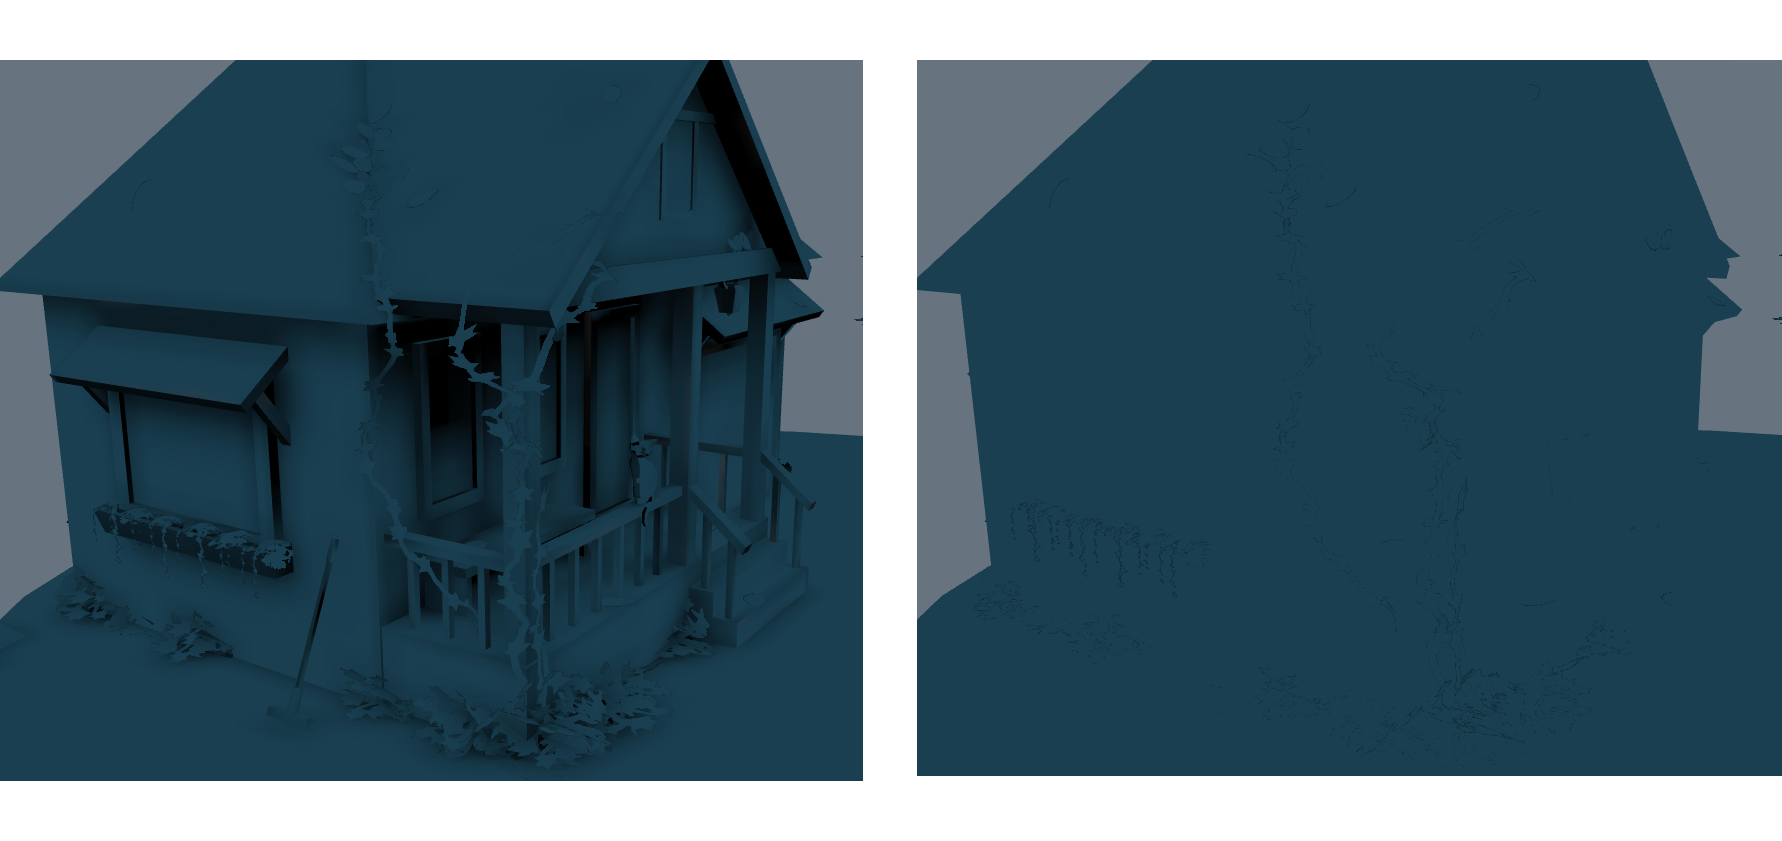
For Soft Directional Light or Environment Light baking, a low number of samples is often used in order to improve the baking performance. This creates some banding artifacts, as you can see in the following image, which uses 15 samples.

To improve the quality of lightmaps, a higher number of sample can be used. This results in the best quality possible, as you can see in the following image, which uses 100 samples.

As a more performant alternative, the lightmap can be filtered using a smart bilateral blur for acceptable quality with greater performance. This can be seen in the following image, which uses 15 samples and has filtering enabled.
Note that the filtering is done on the final baked lightmaps and can create some visible edges over the seams of unwrapped UVs, since the lightmap is not filtered across the seams. Therefore, filtering may not be suitable for every scene. To minimize the artifacts, you should have a good balance between a strong filter and a large number of samples.
Setting Up Models for Baking
Each Model or Render component must have lightmapping enabled, in order for it to receive lightmaps. Lightmapping can be enabled in the component's properties, by checking the Lightmapped option.
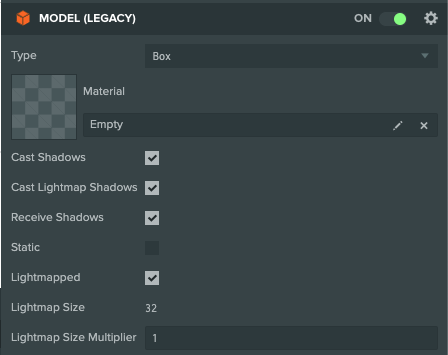
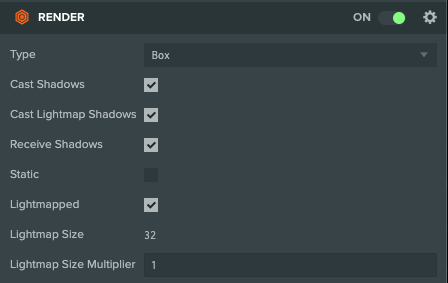
The Cast Lightmap Shadows option determines if the model casts shadows in the lightmap. You can see the resolution of the lightmap texture generated and there is also an option to apply a multiplier to the area of UV1 to affect its size. Lightmap size multipliers are discussed below.
Common Light Settings
There several combinations of light settings that can be used. Each one has a use case and by using lights with different combinations, you can balance high-quality visuals with performance.
| Bake | Affect Non-Baked | Affect Baked | Description |
|---|---|---|---|
| false | true | false | This is the default dynamic light. Affects all non-lightmapped models. |
| true | false | false | This light generates lightmaps for lightmapped models and has no cost at runtime. Most static environment lights could use this setting. |
| true | true | false | This light generates lightmaps but also affects non-lightmapped models. It is useful if you have dynamic/moving entities that need to be lit with this light. For example, a prominent environment light that also should affect the player character. |
| false | true | true | This light is a dynamic light which will affect both lightmapped and non-lightmapped models. |
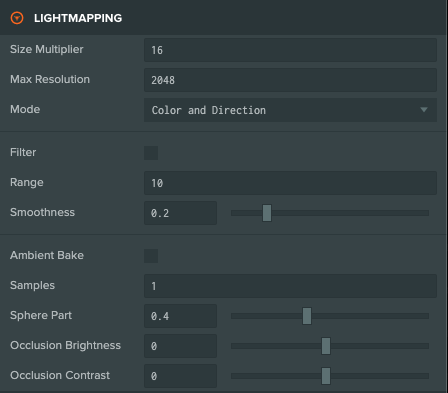
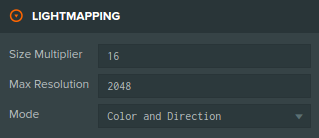
Lightmapping Settings
The Size Multiplier setting affects all Model and Render Components. PlayCanvas will automatically decide what resolution lightmaps are required for a model. It calculates this value based on the scale and geometry area size of the model. You can influence this calculation by modifying the Size Multiplier field in the Model or Render Component's Global Settings.
For example, consider a plane that is 1x1 unit (meter) in size. If the Global Size Multiplier is 16 and the Model Component Multiplier is 2, it will generate a Lightmap Texture size of 32x32 (1 sq/m * 16 * 2). You will have 32x32 pixels on one square meter, which is about 3cm a pixel size.
Max Resolution sets the maximum resolution limit for the generated lightmaps, in order to conserve memory.
Mode allows you to specify what data should be baked (e.g. Diffuse Color or Direction from pixel to light). Direction data is used to simulate simplistic specularity. Only a single direction can be baked, which leads to complexity when multiple lights overlap. Direction baking can be then set on individual lights as well.
Auto-Unwrapping and UV1 Generation
Lightmaps are always applied using the second set of UV coordinates (UV1) on the model asset. For the best results, we recommend that you add a second UV set from the 3D content tool to your model, before you upload it to PlayCanvas. For more information about lightmap friendly UV's, see the UV Mapping section.
If your model doesn't have a UV1 set, the PlayCanvas Editor can automatically unwrap and generate UV1 co-ordinates for the model.
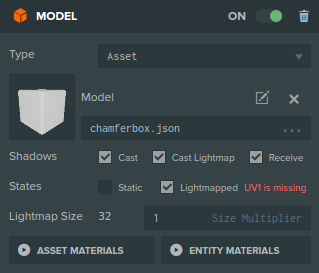
If your model is missing a UV1 map, you will see a warning in the Model Component when you enable lightmapping.
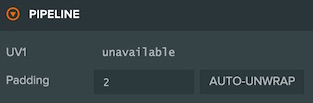
To fix the warning, select the model asset and open the Pipeline section. Click the Auto-Unwrap button and wait for the progress bar to complete. Auto-unwrap will edit the model asset, so if you re-import the model from the source (e.g. upload a new FBX) the precomputed UV1 will be lost. If the uploaded model has no UV1, you will need to auto-unwrap the model again.
The Padding option determines the space between sections when unwrapping occurs. If you see light bleeding (i.e. light that shouldn't be in the lightmap), you can increase the padding to reduce bleeding.