Using the Asset Registry
Click to focus, hold and release SPACEBAR to switch between two A and B models. Press 'L' to load the C model. Hold 'C' to display the C model.
For simple games and products you will set up all your assets in the Editor, they will be preloaded before you application starts, and your app will just work.
For more advanced products you may wish to access your assets in code, change references, modify properties and also stream data in so that your
application can load more quickly. Only loading the assets as they are needed. To do this you'll use the AssetRegistry.
In this tutorial, we'll build a small scene which lets you swap the model on a render component by pressing a key. We'll also dynamically load a third model that is not preloaded. You can see the completed project here.
Setup
The project is set up as follows
- Three model assets are uploaded: A is a model of the letter A, B is a model of the letter B and C is a model of the letter C.
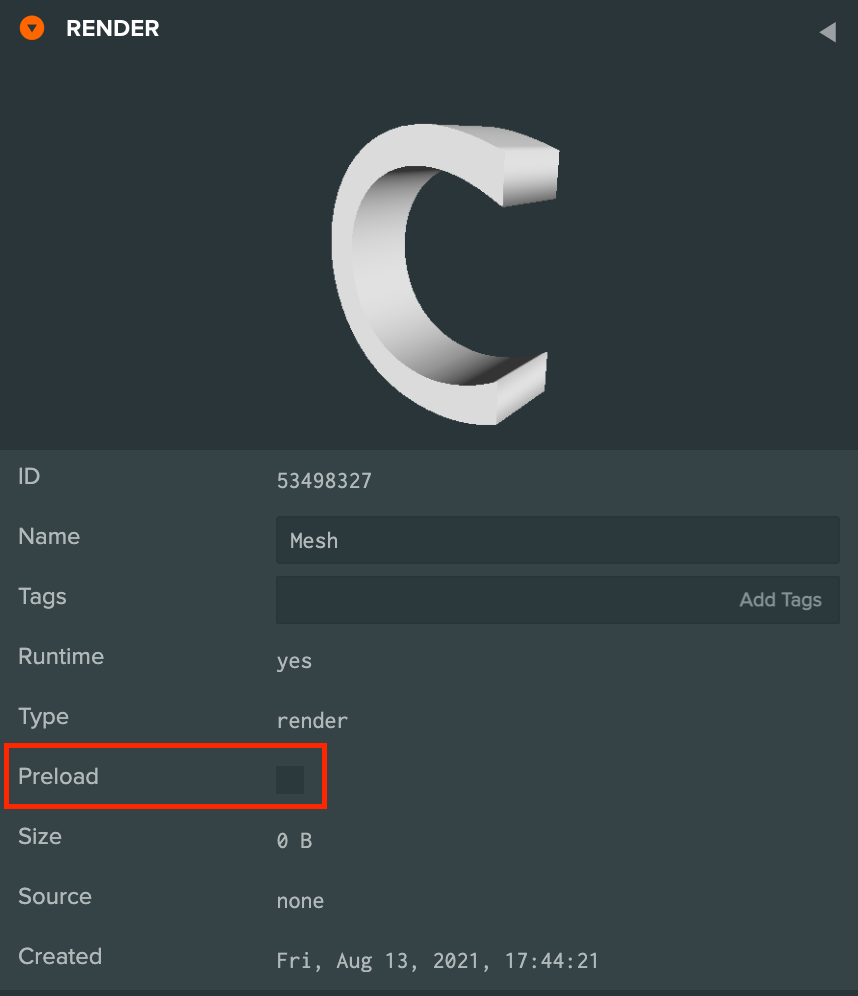
- The C render asset is set up not to be preloaded.
- A render Entity is added to the scene and the model A is assigned to the render component.
- A script component is added to the render Entity and a new script is created called
update_asset.js.
Download the A model, B model and C model and upload them to your project. Ensure that the files are named A.dae, B.dae and C.dae as this will influence the asset names.
The AssetRegistry
The pc.AssetRegistry is available in all scripts as this.app.assets. The
registry is populated with the details of all the runtime assets added to your project whether they are loaded or not. Use the Asset Registry to
find the assets you need in your application.
In this case we've declared three script attributes a, b and c which are assigned to assets in the
Editor. Then they are automatically available in our script.
Using preloaded assets
    if (app.keyboard.isPressed(pc.KEY_SPACE)) {
        if (this.entity.render.asset !== this.b.id) {
            // update the render component to the new Render Asset
            console.log('Changed to B Render Asset');
            this.entity.render.asset = this.b;
        }
    } else {
        // ...
            if (this.entity.render.asset !== this.a.id) {
                // restore original Render Asset
                console.log('Changed to A Render Asset');
                this.entity.render.asset = this.a;
            }
        // ...
    }
The A and B assets are marked as preload in this project. This means that during the loading
screen, these assets are downloaded. They will be ready to use as soon as your application starts. When an asset is loaded, the loaded resource
is available as asset.resource and we can assign the asset to the render component
asset property. If asset.loaded is false, then the asset isn't loaded.

So, the A and B models are preloaded, which means we know they will be ready when we are running the application. This
code checks if the space bar is pressed, and if so we change the render asset on the render component to be the resource property of the asset.
In this case asset.resource will be a pc.Render object. For each different asset type (audio, texture, etc), the
asset.resource property will be the relevant type.
Loading assets at runtime
if (app.keyboard.isPressed(pc.KEY_C)) {
    if (this.c.loaded) {
        if (this.entity.render.asset !== this.c.id) {
            console.log('Changed to C Render Asset');
            this.entity.render.asset = this.c;
        }
    }
} else {
    if (this.entity.render.asset !== this.a.id) {
        // restore original Render Asset
        console.log('Changed to A Render Asset');
        this.entity.render.asset = this.a;
    }
}
The C render asset is not marked as preload, so in the code above, you can see that we check if the resource is loaded
before we use it. if asset.loaded is false, then the resource isn't loaded and we can't change the render component. If the
C render asset is loaded then this.c.resource will be the pc.Render property and
asset.loaded will be true, we'll be then able to assign it.
if (this.app.keyboard.isPressed(pc.KEY_L)) {
    this.app.assets.load(this.c);
}
When you press the L key we load the C model. To do this we pass the unloaded asset into
this.app.assets.load(). If the asset is already loaded, this method will do nothing.
Once the asset is loaded asset.resource will be a pc.Render instance and we can assign the asset to the render
component by pressing the C key.
The complete script
var UpdateAsset = pc.createScript('updateAsset');

UpdateAsset.attributes.add('a', {
    type: 'asset',
    assetType: 'render'
});

UpdateAsset.attributes.add('b', {
    type: 'asset',
    assetType: 'render'
});

UpdateAsset.attributes.add('c', {
    type: 'asset',
    assetType: 'render'
});

// initialize code called once per entity
UpdateAsset.prototype.initialize = function() {
    this.app.keyboard.preventDefault = true;
};

// update code called every frame
UpdateAsset.prototype.update = function(dt) {
    var app = this.app;

    if (app.keyboard.isPressed(pc.KEY_SPACE)) {
        if (this.entity.render.asset !== this.b.id) {
            // update the render component to the new Render Asset
            console.log('Changed to B Render Asset');
            this.entity.render.asset = this.b;
        }
    } else {
        if (app.keyboard.isPressed(pc.KEY_C)) {
            if (this.c.loaded) {
                if (this.entity.render.asset !== this.c.id) {
                    console.log('Changed to C Render Asset');
                    this.entity.render.asset = this.c;
                }
            }
        } else {
            if (this.entity.render.asset !== this.a.id) {
                // restore original Render Asset
                console.log('Changed to A Render Asset');
                this.entity.render.asset = this.a;
            }
        }
    }

    if (app.keyboard.isPressed(pc.KEY_L)) {
        app.assets.load(this.c);
    }
};
AssetRegistry events
One thing we don't demonstrate in this example is how to know when an asset is loaded. To do this we use pc.AssetRegistry events
like the "load" event. Here's some sample code:
// find the asset by name in the registry
var asset = this.app.assets.find("A");
// set up a one-off event listener for the load event
this.app.assets.once("load", function (asset) {
    // asset.resource is now ready
}, this);
The "load" event is quite broad. It is fired for every asset that is loaded, so if assets are loaded elsewhere, you
won't know that this is your asset. Instead you can narrow your event down by using the "load:id" event.
// find the asset in the registry
var asset = this.app.assets.find("A");
// set up a one-off event listener for the load event
this.app.assets.once("load:" + asset.id, function (asset) {
    // asset.resource is now ready
}, this);
The above event will only be fired for that specific asset. Much more useful.
Finally, there is one specific coding pattern, that often occurs. So often, in fact, that we've provided a convenient method to do it for you.
var asset = this.app.assets.find("A");
if (!asset.loaded) {
    this.app.assets.once("load:" + asset.id, function (asset) {
        // do something with asset.resource
    });
    this.app.assets.load(asset);
} else {
    // do something with asset.resource
}
This code loads an asset when it is needed, but it's a bit long winded. So, instead, you can use the asset.ready() method. This
code performs the same function as above
var asset = this.app.assets.find("A");
asset.ready(function (asset) {
    // do something with asset.resource
});
this.app.assets.load(asset);
The asset.ready() method will call it's callback as soon as the asset is loaded, if the asset is already loaded, it will call it
straight away. app.assets.load() does nothing if the asset is already loaded.