Real-time Multiplayer with Colyseus
Select create game to open a new game. And click anywhere on the floor to move the object.
On this tutorial you will learn:
- Setting up your Colyseus server
- Synchronizing the state between server and client
- Exchanging messages between client and server
- Matchmaking: how to create, join, and list available games
Materials
Before you start
Prior Knowledge Expected
- Basic PlayCanvas knowledge (See PlayCanvas Developer Resources)
- Basic JavaScript/TypeScript understanding (See TypeScript Handbook)
- Basic Node.js understanding (See Introduction to Node.js)
Software requirements
Creating the Server
We will be making a basic server, hosted locally on your computer for keeping player states. Changes will be synchronized with clients accordingly.
To create a fresh new Colyseus server, run the following from your command-line:
npm init colyseus-app ./playcanvas-demo-server
Let's make sure you can run the server locally now, by running npm start:
cd playcanvas-demo-server
npm start
If successful, the output should look like this in your command-line:
> my-app@1.0.0 start
> ts-node-dev --respawn --transpile-only src/index.ts

✅ development.env loaded.
✅ Express initialized
🏟 Your Colyseus App
⚔️ Listening on ws://localhost:2567
Including the Colyseus JavaScript SDK
Now we need to add the Colyseus JavaScript SDK on PlayCanvas.
We can do that through a "external script" on PlayCanvas project settings.
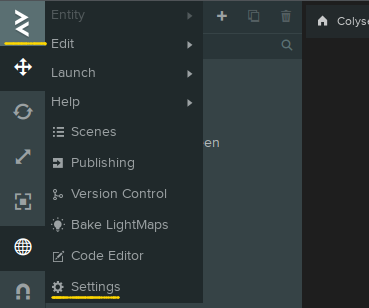
Open "Menu" → "Settings":
From the Settings panel, expand on "External Scripts", and increase the number of "URLs".
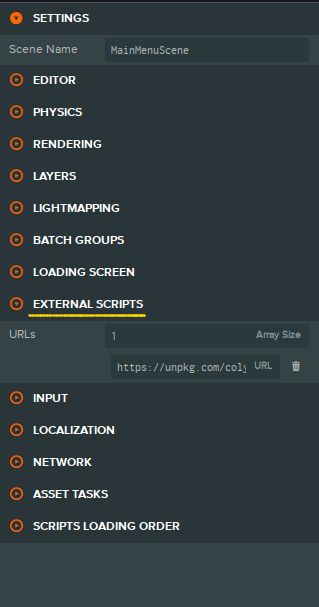
In the new "URL" field, let's include the Colyseus JavaScript SDK, from a CDN:
https://unpkg.com/colyseus.js@^0.15.0-preview.2/dist/colyseus.js
This is going to make the Colyseus JavaScript SDK available for our PlayCanvas scripts.
Establishing a Client-Server Connection
Now, from a new PlayCanvas Script, let's instantiate our Colyseus.Client instance. (see "Creating new scripts")
You can attach this script to a new empty entity called "NetworkManager".
var NetworkManager = pc.createScript('networkManager');

NetworkManager.prototype.initialize = function () {
  //
  // instantiate the SDK
  // (no connection is established at this point)
  //
  this.app.colyseus = new Colyseus.Client("ws://localhost:2567");

  //
  // request to join or create a room "my_room"
  // (establish connection with the server)
  //
  this.room = await this.app.colyseus.joinOrCreate("my_room");
}
Note that we're using the local
ws://localhost:2567endpoint here. You need to deploy your server to the public internet in order to play with others online. You can also use Glitch to host your server publicly.
When you "Launch" your PlayCanvas project now, your client is going to establish a connection with the server, and the
server is going to create the room my_room on demand for you.
Notice that my_room is the default room identifier set by the barebones Colyseus server. You can and should change this identifier
in the arena.config.ts file.
You will be seeing the following message in your server logs, which means a client successfully joined the room!
19U8WkmoK joined!
Room State and Schema
In Colyseus, we define shared data through its Schema structures.
Schemais a special data type from Colyseus that is capable of encoding its changes/mutations incrementally. The encoding and decoding process happens internally by the framework and its SDK.
The state synchronization loop looks like this:
- State changes (mutations) are synchronized automatically from Server → Clients
- Clients, by attaching callbacks to their local read-only
Schemastructures, can observe for state mutations and react to it. - Clients can send arbitrary messages to the server - which decides what to do with it - and may mutate the state (Go back to step 1.)
Let's go back to editing the Server code, and define our Room State in the Server.
We need to handle multiple Player instances, and each Player will have x, y and
z coordinates:
// MyRoomState.ts
import { MapSchema, Schema, type } from "@colyseus/schema";

export class Player extends Schema {
    @type("number") x: number;
    @type("number") y: number;
    @type("number") z: number;
}

export class MyRoomState extends Schema {
    @type({ map: Player }) players = new MapSchema<Player>();
}
See more about the Schema structures.
Now, still in the server-side, let's modify our onJoin() method to create a Player instance whenever a new
connection is established with the room.
// MyRoom.ts
// ...
    onJoin(client: Client, options: any) {
        console.log(client.sessionId, "joined!");

        // create Player instance
        const player = new Player();

        // place Player at a random position
        const FLOOR_SIZE = 4;
        player.x = -(FLOOR_SIZE/2) + (Math.random() * FLOOR_SIZE);
        player.y = 1.031;
        player.z = -(FLOOR_SIZE/2) + (Math.random() * FLOOR_SIZE);

        // place player in the map of players by its sessionId
        // (client.sessionId is unique per connection!)
        this.state.players.set(client.sessionId, player);
    }
// ...
}
Also, when the client disconnects, let's remove the player from the map of players:
// MyRoom.ts
// ...
    onLeave(client: Client, consented: boolean) {
        console.log(client.sessionId, "left!");

        this.state.players.delete(client.sessionId);
    }
// ...
The state mutations we've done in the server-side can be observed in the client-side, and that's what we're going to do in the next section.
Setting up the Scene for Synchronization
For this demo, we need to create two objects in our Scene:
- A Plane to represent the floor
- A Capsule to represent the players, which we will clone for each new player joining the room.
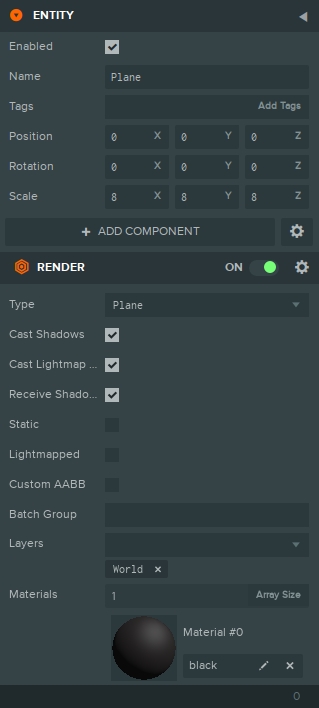
Creating the Plane
Let's create a Plane with scale 8.
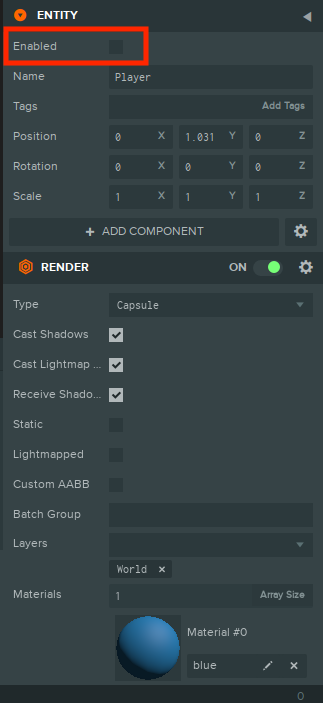
Creating the Player
Let's create the Player capsule with scale 1.
Make sure to uncheck the "Enabled" property. We will not have any Player instances enabled until we have active
connections with the server.
Listening for State Changes
After a connection with the room has been established, the client-side can start listening for state changes, and create a visual representation of the data in the server.
Adding new players
As per Room State and Schema section, whenever the server accepts a new connection - the
onJoin() method is creating a new Player instance within the state.
We're going to listen to this event on the client-side now:
// ...
this.room.state.players.onAdd((player, sessionId) => {
  //
  // A player has joined!
  //
  console.log("A player has joined! Their unique session id is", sessionId);
});
// ...
When playing the Scene, you should see a message in the browser's console whenever a new client joins the room.
For the visual representation, we need to clone the "Player" object, and keep a local reference to the cloned object based on their
sessionId, so we can operate on them later:
// ...

// we will assign each player visual representation here
// by their `sessionId`
this.playerEntities = {};

// listen for new players
this.room.state.players.onAdd((player, sessionId) => {
  // find the base Player representation (not enabled)
  const playerEntityToClone = this.app.root.findByName("Player");

  // clone the Player representation, and enabled it!
  const entity = playerEntityToClone.clone();
  entity.enabled = true;

  // set position based on server data
  entity.setPosition(player.x, player.y, player.z);

  // add clone to the Scene
  playerEntityToClone.parent.addChild(entity);

  // assign visual representation by their `sessionId`
  this.playerEntities[sessionId] = entity;
});
// ...
The "Current Player"
You can keep a special reference to the current player object by checking the sessionId against the connected
room.sessionId:
// ...
this.room.state.players.onAdd((player, sessionId) => {
  // ...
  if (room.sessionId === sessionId) {
    this.currentPlayerEntity = playerEntities[sessionId];
  }
  // ...
});
Removing disconnected players
When a player is removed from the state (upon onLeave() in the server-side), we need to remove their visual representation as well.
// ...
this.room.state.players.onRemove((player, sessionId) => {
  // destroy entity
  this.playerEntities[sessionId].destroy();

  // clear local reference
  delete this.playerEntities[sessionId];
});
// ...
Moving the players
Sending the new position to the server
We are going to allow the "mouse down" event; use ray
cast to determine the exact Vec3 position the player should move towards, and then send it as a message to the server.
// ...
this.app.mouse.on(pc.EVENT_MOUSEDOWN, (event) => {
  // Create the "bounding box" for the floor
  const boundingBox = new pc.BoundingBox(new pc.Vec3(0, 0, 0), new pc.Vec3(4, 0.001, 4));;

  // Initialise the ray and work out the direction of the ray
  // from the a screen position
  const ray = new pc.Ray();
  const targetPosition = new pc.Vec3();

  const cameraEntity = this.app.root.findByName("Camera");
  cameraEntity.camera.screenToWorld(event.x, event.y, cameraEntity.camera.farClip, ray.direction);
  ray.origin.copy(cameraEntity.getPosition());
  ray.direction.sub(ray.origin).normalize();

  // Test the ray against the ground
  const result = boundingBox.intersectsRay(ray, targetPosition);

  if (result) {
    // Adjust position height
    targetPosition.y = 1.031;

    //
    // Send new target player position to server.
    //
    this.room.send("updatePosition", {
        x: targetPosition.x,
        y: targetPosition.y,
        z: targetPosition.z,
    });
  }
});
Receiving the message from the server
Whenever the "updatePosition" message is received in the server, we're going to mutate the player that sent the
message through its sessionId.
// MyRoom.ts
// ...
  onCreate(options: any) {
    this.setState(new MyRoomState());

    this.onMessage("updatePosition", (client, data) => {
      const player = this.state.players.get(client.sessionId);
      player.x = data.x;
      player.y = data.y;
      player.z = data.z;
    });
  }
// ...
Updating Player's visual representation
Having the mutation on the server, we can detect it on the client-side via player.onChange(), or player.listen().
player.onChange()is triggered per schema instanceplayer.listen(prop)is triggered per property change
We are going to use .onChange() since we need all the new coordinates at once, no matter if just one has changed individually.
// ...
this.room.state.players.onAdd((player, sessionId) => {
  // ...
  player.onChange(() => {
    this.playerEntities[sessionId].setPosition(player.x, player.y, player.z);
  });

  // Alternative, listening to individual properties:
  // player.listen("x", (newX, prevX) => console.log(newX, prevX));
  // player.listen("y", (newY, prevY) => console.log(newY, prevY));
  // player.listen("z", (newZ, prevZ) => console.log(newZ, prevZ));
});
Extra: Monitoring Rooms and Connections
Colyseus comes with an optional monitoring panel that can be helpful during the development of your game.
To view the monitor panel from your local server, go to http://localhost:2567/colyseus.

You can see and interact with all spawned rooms and active client connections through this panel.
More
We hope you found this tutorial useful, if you'd like to learn more about Colyseus please have a look at the Colyseus documentation, and join the Colyseus Discord community.