Basic Cameras
Camera Entities
To view the scene created by your PlayCanvas application a Camera Entity is used to render it to the screen.
In order to run your Scene from the PlayCanvas Editor, you must add at least one active Camera Entity to your Scene.
Creating a Camera Entity
To create a new Camera Entity, you need to add a Camera Component to an Entity.
- Select the root Entity of your Scene in the Entity Explorer
- Create a new Entity by selecting New Entity from the Entity menu.
- Add a Component by selecting New Component from Component menu
- Choose Camera when you are prompted to choose which type of Component to create
As making a Camera Entity is a common task there is a shortcut: Select New Entity -> New Camera in the Entity menu. This is equivalent to creating a new Entity and adding a Camera Component to it.
Camera Properties
Like all Components, the Camera Component has a set of properties which alter its behavior.
Enabled
If the enabled property is true, then the camera will render the scene to its rendering buffer when the Scene loads. Multiple cameras can be enabled at the same time. This is useful in situations where you want to implement a split-screen game or a mini-map, for example. The priority property determines the order in which the enabled cameras are rendered.
Clear Color Buffer
If this property is checked, before rendering the scene, the camera will erase whatever was previously in the camera's frame buffer (namely the previously rendered frame), and fills it with a clear color.
Clear Color
The color to which the frame buffer is cleared, providing that the Clear Color Buffer property has been checked.
Clear Depth Buffer
If this property is checked, before rendering the scene, the camera will erase whatever was previously stored in the camera's depth buffer. Normally, this should be left checked but in certain circumstances, where you don't care about depth order when rendering the scene, it can be an optimization to disable it.
Projection
The projection type determines which type of matrix projection is used to convert the 3D scene in to the 2D view rendered to the page.
The perspective projection is the most common type for games. Alternatively, you can use an orthographic projection, which renders the scene without perspective so is useful for 2D games.
Field of View
The field of view of a camera determines how much of the scene the camera shows. It is measured in degrees (°) so the default value of 45° means that the top edge of the view to the bottom edge of the view form an arc of 45° from the position of the camera
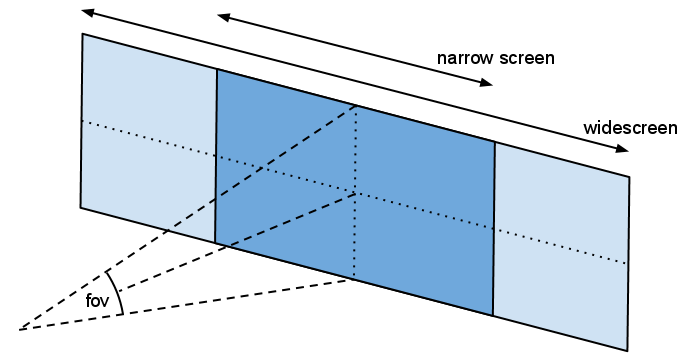
You can see in this diagram that because the fov value is independent of the width of the display a wide screen view (light blue)
shows the same amount vertically but more horizontally than a narrow screen view (dark blue).
Near Clip
The near clipping distance is the distance, in metres, from the camera before which nothing will be drawn.
Far Clip
The far clipping distance is the distance, in metres, from the camera after which nothing will be drawn.
Priority
This value is a number which determines the order in which a camera is rendered, if multiple cameras are enabled. Smaller numbers are higher priority and will be rendered first.
Viewport
The viewport represents a rectangular area on the camera's rendering buffer. There are 4 values in the following format: Bottom Left X, Bottom Left Y, Width, Height. The values are normalized coordinates, where the rendering buffer, regardless of dimensions, is considered to be mapped in X and Y to 0..1. So to limit the camera to rendering in the bottom left quadrant of the screen, set the viewport to 0, 0, 0.5, 0.5.