Basic Audio
The tank is moving around the robot. You can shoot by clicking anywhere on the game.
Sound sources and Listeners
In this tutorial we have placed a robot in the middle of the scene with a tank rotating around the robot. The sound playing from the tank's engine is heard relative to the ears of the robot. As the tank moves around the robot we can hear the sound shifting position from left to back to right to front.
The basic audio system in PlayCanvas centers on two Component types.
The Sound Component plays audio assets like Wave, MP3 or Ogg Vorbis files. Imagine Sound Components like loudspeakers in the scene. There can be many Sound Components in the scene each playing multiple sounds.
Each Sound component comprises of a number of slots. Each slot has a name and defines a specific sound to be played. You can have multiple slots on a Sound component each playing independently from each other.
The AudioListener Component determines how a Sound is heard. Imagine AudioListener Components like a microphone in the scene. There can only be one active AudioListener at a time.
Scene Setup
You should look at the Hierarchy for this tutorial yourself in the Editor. These are the main Entities in the Scene:
Playbot
Our robot. It has an AudioListener component so all sound is going to be heard relative to the position of the robot.
Rotator
An Entity used to rotate the tank. It has a Script component with a script that rotates the entity around the Y axis at a constant speed.
Tank
Our tank. It is a child of the Rotator Entity, that way it rotates with it. It has a Sound component with 2 slots:
The "engine" slot is responsible for playing the looping engine sound of the tank. It's set to Auto Play as soon as the scene is loaded.
The other slot is the "shoot" slot. That slot is played by script every time we click on the canvas to make the tank's turret shoot. The Overlap checkbox is true for this slot which means that we can shoot multiple times and a new sound will be created every time instead of using just a single sound that restarts every time.
The tank also has a Script component which handles user input to make its turret shoot and also handles playing the shooting sound and other effects like a simple animation and a particle system.
Creating Sound sources
To create a Sound source select the Entity you wish to add the Sound to and choose New Component from the Entity menu. Select sound from the list of Components and press the Add button.
Sound properties will now appear in the AttributeEditor.
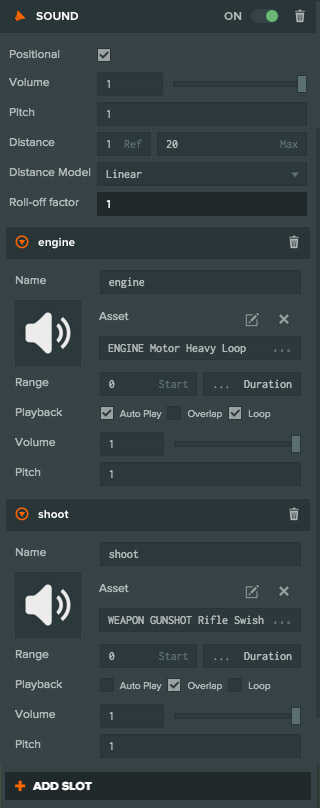
Here is the Sound component of the tank Entity. Here's some information about some of the properties:
Positional
If this is checked it means that the sound will be heard relative to the position of the current AudioListener (our robot) in 3D space. If this is unchecked then the sound will be heard in 2D by both speakers.
Asset
Each slot has an Asset picker which allows you to play different audio assets from different slots. See importing assets for details on how to upload audio assets.
Once you have uploaded your assets, use the Asset Picker to select the audio asset for your slot.
Auto Play
If you want a slot to start playing as soon as the scene is loaded then set this to true. Otherwise set this to false and play the slot using a script.
Overlap
If this is unchecked then the slot will play its sound from the beginning every time you play it in script. If this doesn't matter to you for example if you are playing some background music or a sound that doesn't need to be repeated leave this unchecked.
If however you want to play a sound repeatedly without stopping every time the sound is replayed, set this to true. Our shooting sound is set to overlap in this tutorial.
Loop
By default, the audio sample will be played once, and then stop. If you want the sound to loop continuously, e.g. for background music, then you can check the Loop box. Our engine is a looping sound in the example but the shooting sound is not.
Creating Listeners
To create an AudioListener, select the Entity you wish to represent the listener. Often, this will be the in-game camera as this is where the players 'head' is. In our case the AudioListener is attached to the robot.